Developing with NetBeans (Part VI): Remote debugging PHP
In this extra chapter of the series ‘Developing with NetBeans’ I am gonna describe how to debug a remote server, both a real remote one or a virtual one (somebody mentioned Vagrant?).
NetBeans incorporates the remote debugging tool so I will use it. However, we don’t mandatory need to use this tool since we can configure our local development copy for doing remote debugging as well (as explained at the end of this article).
First thing to do is to make sure that server has access to your local 9000 port (or whatever port you have configured for debugging):
-
If having a real remote server, create a reverse tunnel with this command: ssh -R 9000:127.0.0.1:9000 myuser@myserver.com . This basically means that the server will send to port 9000 in your local environment whatever is received in the port 9000 (in the server).
-
If using Vagrant, we cannot use remote tunneling. Instead, we have to configure xdebug itself for sending the data to our local IP. So, open xdebug configuration file (usually /etc/php.d/xdebug.ini) and add your local IP in the xdebug.remote_host directive. Which is your IP? Well, you have to check which active connections to port 22 (ssh) you have. A command like netstat -tp | grep ssh (executed in the Vagrant box) should list all the connections. The one under ‘Foreign Address’ (remove the ‘grep’ in the command for seeing the header of the table) should tell you which IP is your local environment from the Vagrant box perspective. Do no forget to restart the Apache/nginx server after changing the configuration.
Next, create a New Project with the option ‘PHP Application from Remote Server’ and then download the needed files (typically you will want all the coding related files and you will exclude the regular files such as images).
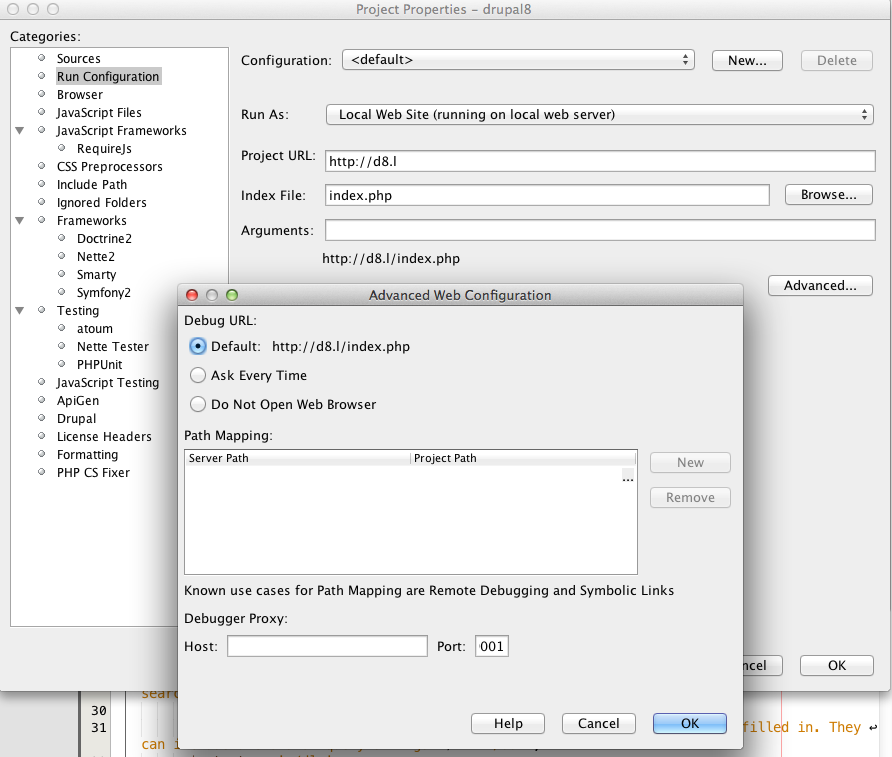
Next, you have to configure the path mappings.
Where? In the ‘Advanced Web configuration’ (under Run configuration), ‘Path mapping’ section.

Why? We need them in order to NetBeans not to get lost if some of the files are behind a symbolic link.
So if, for example, in your server you have symbolic link that goes from /var/www/html/sites/all/modules/custom to /var/www/git/custom, then you will have to configure a path mapping for them because, if not, NetBeans will get lost when trying to debug any file living behind that symlink. So what you have to do is to tell NetBeans where it is going to find, in your local filesystem, the files requested that are under /var/www/git/custom in the server.
So basically this means you have to configure a couple of values in the path mapping:
-
Server path: the path in the server. In this example /var/www/git/custom
-
Project path: the path in your local computer. In this example it could be something like /Users/myself/git/custom
After that, just debug the project as you would debug any other normal project (and explained in the part IV of this series).
As commented before, we don’t necessarily have to create a project with the option ‘PHP Application from Remote server’. We can use our existing local copy since all NetBeans need is a local connection to the port 9000 where NetBeans is listening. So just make sure that the connection is established from the remote server (as explained before) and NetBeans will use your local copy as a follow up, but the data will come from the server. Cool, huh?
However, the ‘PHP Application from Remote server’ is still useful if we want to change the server files by editing them directly in Netbeans (files will be transfered to the server each time they are saved locally).